So I've not been knitting that much since I really got into running. Hearing about a charity Christmas run I couldn't wait to get some knitting done and make myself a super uncool set for it and combine the old hobbies with the new. Forget Santa hats, think Christmas trees!
Enter the Un-Cool Christmas set:
Oh boy, that's awesome! Too bad I was too focused on the knitting and actually forgot to sign up for the race but.. oh well!
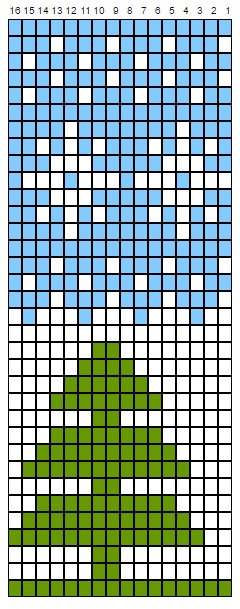
I was asked on Instagram if I had a pattern for this, which I don't. Totally winged it. But I did promise I'd whip up some charts to the patterns so here goes:
The one for the hat is a 16 stitch repeat and the leg warmers are 4 stitch. Merry Christmas yall!
Here's a pattern I'm quite happy with. Mainly the chart and the colorwork. I wanted something fairy taleish and this is what I came up with. I used mainly stock yarns, left over bits, 10 different color in total.
Size wise these may not be the most practical ever, the pair I made would ideally fit someone with a size 39 foot and a very slim leg. For me the socks are snug around the calf and ankle and required some blocking. But here's the charts and rough instructions anyway, feel free to modify as you see fit :)
Instructions:
The socks are knit top down. Chart is read from top to bottom and divided in 2 columns for an easier read and possible printing.
Size: EU 37-39 (7-8.5 US, 5-6.5 UK) (may vary by your gauge) I'm a size 39 with a wide calf and these had to be stretched out to fit my calves, prepare for a very snug fit.
Yarn: Novita 7 veljestä (150 g = 300 m, 75% wool / 25% polyamide) Gauge: 23 st = 10cm Needle: 4 mm
Cast on 56 st. Divide them on 4 double pointed needles, 16st on each needle. *Knit 1, purl 1* for about 6 rows. Begin working as per chart repeating the 28 stitch pattern. The chart is read from bottom to top. When you reach the blue line at the top of the right hand column, make reinforced heel as per instruction or any heel of your choice, then continue the chart from the bottom of the left column.
Reinforced heel: Once you reach the mark for heel knit (dark green) on needles I, II and III and then leave needles II and III waiting to be worked on later. Begin reinforced heel on needles IV and I. *Slip 1 knitwise and knit 1* and repeat this for all stitches on needles IV and I. Then turn to the the wrong side of the sock, slip 1 purlwise, purl 31. Repeat these two rows 14 times = 28 rows.
Then on the right side (still knitting slip 1, knit 1 on right side and purl on wrong side) knit until you have 10st left on the needle, slip one, knit one, pass slipped stitch over and turn to wrong side. Slip 1 purlwise, purl 8, purl 2 together and turn to right side. Knit in this manner until you have 10 stitches left total on the heel. Divide the remaining stitches on two needles. Continue in dark green and pick up 13 st on the side of the heel flap on needle I, knit needles II and III, pick up 13 st on the heel flap again on needle IV.
The gusset: You now have 64 stitches in total. Continue working the chart from where we left off (heel mark). Knit 2 together at the end of needle I every second row and slip 1 knit 1, pass slipped stitch over at the beginning of needle IV every second row until you have 14st on each needle again. Note that the pattern on the decrease rows will disrupt at the decrease points but work the rest of the stitches according to chart. Continue according to chart.
Shape toe: Once you've reached row 92 begin shaping toe. At the end of needles I and III; knit the third and second to last stitch together and knit 1. At the beginning of needles II and IV knit 1, slip 1, knit 1, pass slipped stitch over. On the remaining stitches knit a checkered pattern as per chart. When you are left with 3 st per needle cut the yarn and run the thread tail through remaining stitches twice; pull firmly and darn in the ends.
It's been soooo long since my last blog post. During the past few years I've concentrated on my Etsy shop and making felt bags and then watched my interest slowly drift away and move on to other things. I'm a simple creature and my attention tends to wander, and it was no surprise my Etsy shop took and died without much notice after withering away slowly :D But I'm still crafting every now and then and now that I've created something worth sharing again I'm back on blogger!
I'd say all the best socks are love socks, that is, made with love. But these ones sprung from pure happiness and were made with such affection, they had to be named love socks.
Instructions:
The socks are knit top down. Chart is read from top to bottom and divided in 2 columns for an easier read and possible printing. Pattern is also available on Ravelry
Size: EU 42-43 (11.5-12 US, 9.5-10 UK) (may vary by your gauge)
Yarn: Novita 7 veljestä (150 g = 300 m, 75% wool / 25% polyamide) Gauge: 23 st = 10cm Needle: 4 mm
Cast on 64 st. Divide them on 4 double pointed needles, 16st on each needle. *Knit 1, purl 1* for about 6 rows. Begin working as per chart repeating the 16 stitch pattern. The chart is read from bottom to top. When you reach the pink line at the top of the right hand column, continue the chart from the bottom of the left column.
Reinforced heel:
Once you reach the mark for heel knit (dark green) on needles I, II and III and then leave needles II and III waiting to be worked on later. Begin reinforced heel on needles IV and I. *Slip 1 knitwise and knit 1* and repeat this for all stitches on needles IV and I. Then turn to the the wrong side of the sock, slip 1 purlwise, purl 31. Repeat these two rows 15 times = 30 rows.
Then on the right side (still knitting slip 1, knit 1 on right side and purl on wrong side) knit until you have 10st left on the needle, slip one, knit one, pass slipped stitch over and turn to wrong side. Slip 1 purlwise, purl 8, purl 2 together and turn to right side. Knit in this manner until you have 10 stitches left total on the heel. Divide the remaining stitches on two needles. Continue in dark green and pick up 14 st on the side of the heel flap on needle I, knit needles II and III, pick up 14 st on the heel flap again on needle IV.
The gusset:
You now have 70 stitches in total. Continue working the chart from where we left off (heel mark). Knit 2 together at the end of needle I every second row and slip 1 knit 1, pass slipped stitch over at the beginning of needle IV every second row until you have 16st on each needle again. Note that the pattern on the decrease rows will disrupt at the decrease points but work the rest of the stitches according to chart. Continue according to chart.
Shape toe:
Once you've reached row 94 begin shaping toe. Knit darker grey on the 2 last stitches on needles I and III and 2 first stitches on needles II and IV and between those knit a checkered pattern of 1 dark grey and 1 light grey alternating.
At the end of needles I and III; knit the third and second to last stitch together and knit 1. At the beginning of needles II and IV knit 1, slip 1, knit 1, pass slipped stitch over. On the remaining stitches knit a checkered pattern as per chart. Repeat the decreases every second row until you have 10 st remaining on each needle. After that repeat the decreases on every row. When you are left with 3 st per needle cut the yarn and run the thread tail through remaining stitches twice; pull firmly and darn in the ends.
Decided to finally make myself a bag that will catch attention wherever I go to serve as a walking advertisement for my little bag business. I wanted a turquoise bag with few beaded flowers. A FEW! But once I got going, I just couldn't stop. So I ended up making a bag that looks like a unicorn threw up beads on it.. AND I LOVE IT!
my new dress (8€) -with a few added sequins and corrective stitches- will go perfectly with the bag!
It's so wonderfully over the top, so brilliantly kitsch and fun it is perfect for the gloomy Finnish winter to cheer up a dull day. And we have no shortage of those here! One might think our national color was mousy grey and national animal Tard, the grumpy cat, as a people that's about how cheery we are.
But in short, here is my Christmas gift from me to myself. Wishing you all a very cheery Christmas, with my cheesy bag in hand I'm bound to have one myself!
Namaste!
I am going through a very oriental phase, from daily meditation to decorating my lodgings I am inspired by everything and anything oriental. The indian inspiration is also influencing my craft and the latest two finished projects show case my love for all things oriental beautifully, if I may say so myself (and I may). But the truth is I say it way too often to convince myself of my own worth, thus fueling my ego and feeding it, but never satisfying it completely.
As happy as I should be in all the beautiful things my hands are capable of producing, these things or any other thing should not be my source of self value. Here is a nugget of wisdom from an excellent site Calmdownmind.com:
The Ego can feel very worthy in a moment and feel terribly unworthy the next moment. You can notice the Ego constantly trying to feel valuable. Neediness stems from the feeling of lack inherent in all Egos. In truth, the Ego is empty; it has no reality except in ideas. Something so “unreal” is bound to feel insecure of its identity. Remember that “Ego” is a false self, it’s not who you are at all. But you can’t know who you are unless you let the Ego dissolve completely.
Stop fuelling the Ego structure present in you. Let it die, let it dissolve completely. You will know what true joy, love and peace, really mean when the Ego structure dissolves completely. The Ego will always try to sustain itself, and keep itself in the center of your existence, unless you see through it and stop fuelling it with your attention. Freedom from Ego is freedom from feelings of unworthiness, and this opens up the floodgates of abundance in every from to rush into your life.
So shut up, Ego. These slippers may be awesome but even if they weren't I would still be awesome myself!
Presenting a pink bag made to order I just shipped out to the States and a newly finished phone cozy (that would suit my pink phone brilliantly!) but which can be found for sale here.
How come winter seems to always creep up on me and I find myself looking for last years winter wear when the first snow has already melted away. It shouldn't come as a surprise, winter is cold and inevitable. It is apparent I'm not a Stark - though the winter is most definitely coming, I have not braced myself. But it's not all bad. This sudden awakening to the reality of colder days inspired me to make a quick and easy new winter hat. It's super easy and fun to do, but the end results are impressive, so I thought I'd share it with you all. Don't be intimidated by the long instruction part below, once you get the hang of Tunisian crochet this is easily a one evening project. Make it multicolored like mine (and risk being called the "one woman gay pride parade" for wearing a tad too much color) or make a nice and subtle grey one for example.
You will need: *A 40cm cable needle or double pointed needles in size 8-10mm (I used 10mm but recommend using a thinner needle) *A double ended Tunisian Crochet Needle in size 8mm *1x50g skein of Naturgarn by Viking of Norway in dark green (color 633) *2x50g skein of Naturgarn by Viking of Norway in variegated purple (color 669)
Íf you want, you can leave out the green and use the variegated purple instead, this way you will only need 2 skeins of yarn for the whole project.
With the dark green yarn cast on 44 stitches on the cable needle or double pointed needles and join in the round.
Row 1: *Knit 1, purl 1*, repeat around
Row 2: *Knit 1, purl 1*, repeat around
Row 3: Increase stitches by: *Knit in front and back, purl 1*, repeat around.
If you are unfamiliar with this type of increasing, here's a video tutorial by Kaleidoscope Yarns on how to do it.
Bring the first 10-20 stitches from your knitting needle to the double ended crochet needle. Turn the work around and work from left to right. Take the variegated yarn and bring yarn over to the needle and pull it through the first loop. Bring yarn again on the needle and this time and from here on pull it through two loops. Again bring the yarn over to the needle and pull it through 2. Repeat until you've finished all stitches on the needle. Then pick up more stitches onto the crochet needle and repeat until you have reached the end of the row.
Here you see how the Tunisian crochet works; every green stitch forms a vertical stitch and the purple runs through it. Working with two contrasting colors really brings out the weave like pattern of Tunisian crochet.
Row 4: With the dark green yarn work from right to left on the right side of the work and pick up around twenty stitches on the needle as follows. Insert crochet needle into the vertical stitch on the row below, bring yarn over to the needle and pull it through the loop.
Repeat as long as you can/wish and turn the work over. With the contrasting yarn bring the yarn over to the needle, pull through 2 loops and repeat.
When working with two different yarns on one crochet needle I find it easier to keep track if I never have less than 2 stitches on the needle. That is, when I'm coming back with the contrasting color I don't touch the last stitches. In my opinion it's easier to continue working this way.
Once you've done that, turn the work again and pick up more stitches on the needle. Basically you're just picking up stitches with the front end and binding them off with the other end of the needle and that's Tunisian crochet for you!
Work like this for 3 more rows (green vertical stiches, purple on the inside) and replace green with another skein of purple. From here on end you will have purple vertical stitches. Continue in same manner for 12 more rows.
Begin cast off on row 21: Skip every 3rd vertical stitch that you would have picked up on rows below and otherwise work as before. Repeat this for about 6 rows until you've only got a handful of stitches. Cut the yarn and run it through the remaining stitches twice, weave in the ends and you're done! SUPEREASY!
So, the bad news is I wont be able to take part in the upcoming Craft Fair, Kätevä&Tekevä. I was really looking forward to it, but what can you do.
The good news is I can now list on Etsy the items I had been saving for the Fair. I have been busy making phone cosies and these are just the first two I listed. Stay tuned for plenty more :)
These two beauties are now available on Etsy here.
I haven't updated my blog in a while, I've been so busy and there's so much going on right now. In preparation for my very first craft fair I'm making phone cozies. About 2 million of them, it feels. I have a hunch they'll be a success, need to have something small and inexpensive in my stock too for the impulse shoppers. More updates and better quality photos later.
Back home from summer cabin again and time for some blog updates. I don't know what it is about that place but I feel incredibly creative up there in the woods. While there I managed to finish this gorgeous retro purse and made some felt beads in autumn colors, as it is apparent that fall is upon us. I know this because I feel like knitting again and buying school supplies. Always a sign of fall to me :)
Ooooh, another cute new bag just finished! Super girly and super cute, if I may say so myself, and I may. This little beauty was knitted out of beautiful sand colored Naturgarn yarn by Viking and embroidered with DMC embroidery thread. After knitting and felting bags for a year now I have tried and tested many different yarns and flosses and these have become my trusted favorites. The Naturgarn yarn felts beautifully and evenly in washing machine and the DMC embroidery threads have a silky gloss to them that compliments the wool superbly.
In this project I also used some seed beads in matching colors and although they can barely be seen on these pictures they give a nice extra kick to the embroidery, glistening here and there and making the cherry blossom branch more lifelike. There is a pink polka dot lining on the inside which makes this bag fun both inside and out.
Stay tuned for more gorgeous bags from my little MuffinTopKnits-collection :)
Much like on the classic 80's tune, the heat is on. It's so hot it's unbearable. Hence I have not been too active with my warm and wooly little things. But here's a small project I managed to finish despite the hot scandinavian summer.
Ooh, summer, I love thee. But you're bit too hot to handle!
Oh Hooray and Happy Days!
We've been invited to a summer wedding of two incredibly wonderful people and it should be something to be happy about. But I must admit I stress over every possible celebration, be it mine or some body else's party. I can not understand people who throw weddings, it's such a hassle, but enjoy going to one as a guest, despite the stress. This time the stress concentrated on two spesific things: A) I can't fit into any of my dresses and cannot afford a new one and B) I have no bag for the wedding. Solutions to problem A= eat only cottage cheese, quark, meet and veg for a month and loose 7kg (15.4 lbs) and B= just make a bag!
I am happy to announce I did both and can now look forward to the wonderful event! And am very happy with the results :)
The bag turned out so pretty I might even use it in my own wedding if I ever have one. Which I seriously doubt...
This weekend was probably the best ever. Nothing major happened. I just had an amazingly relaxing time deep in the forest at my parents' summer place. Good, healthy food, a sauna by the lake, fresh air and tranquility created by the surrounding nature and lack of neighbours in sight. No electricity, nothing fancy. Just pure heaven.
In between relaxing and relaxing even more, I managed to finally paint the brooms my mam had asked me to paint about five years ago. Dad, always prepared like a boy scout, whipped out a power drill and made me a candle holder from a block of old grey wood I found. I'm a bit of an airhead myself, so I wouldn't dare burn any candles on a wooden base, so my mam, who is a serious hoarder (=hamstraaja, moi äiti!) promised she'd dig out four metallic candle cups from her stockpile, that woman has everything imaginable up her sleeve.
Dad at work
Back in town, the block fits perfectly in the decor on our back yard deck.
I had to sample the paint before making the brooms, so I made this little welcome sign out of scrap wood
A deadwood branch we found in the woods mounted on a piece of old wood, I'll paint this white and make it an ornament tree, more about this project later!
Coin purses, coin purses! It must be raining coin purses!
There will be an abundance of coin purses soon on my Etsy shop as I'm stitching away like there's no tomorrow to get them done! These small projects have been hiding in the project closet for a few months as I have been pre-occupied with other stuff (like getting addicted to Sims), but now I'm determined to see them finished.
Here's the first two creations. Pink and yellow, it's like raspberry and mango sorbet!
It's almost June and the nature is getting greener every day. I've drawn inspiration from the nature around me in making a pair of slippers as a present for a friend. The green felt goes beautifully well together with the multicolored beads. Lovely, if I may say so myself :)
In the anticipation of a beautiful summer I (with A LOT of help from my dad) built a humongous vegetable grow box on our back yard. When empty, it looked like a coffin in the middle of our little garden. I was so tempted to troll the neighbours with it but thought they might not appreciate my morbid sense of humor.. But it's a great box, it's now filled with 200kg of dirt and some vegetables which hopefully will grow and bear fruit (or veg more like) and after harvest time it can serve as a handy place for our friends to curl up in and die of envy brought on by our superior feast of vegetables!
I've been looking for something to hang on our livingroom wall for over a year without any success. Solution: make some art! I bought a 60x90cm canvas, four tubes of guache paint (white, black, indian yellow and turquoise) and a brush. Then I started painting mixing together different shades of grey and layering the paint in crossed strokes. I added a few dabs of yellow and turquoise and mixed them up with the grays and voilá! A piece of contemporary art in 30 minutes and with 30€ total.
Love the way it turned out!
After hanging it up on the wall I realized I should've picked even a bigger canvas. Though this one at the shop seemed enormous, once hung it looked tiny. Might have to consider making a bigger one.