Wednesday, January 26, 2011

Fleur de lis beanie

Sunny, glorious day outside! Life would feel so magnificent right now if it wasn't for this darn cold! Christ on a bike, I'm sick and tired of bein sick and tired all the time. 
Well, at least I have time to post up the instructions for the Fleur de lis beanie I finished few weeks back. It's a bit on the small side (57cm around), so I'm not overly happy about it, but maybe I'll find a head to match it. On how to create charts out of pictures, see tutorial.

Yarn: Novita 7 veljestä  (150 g = 300 m, 75% wool / 25% polyamide)
Gauge: 18 st = 10cm
Needle: 4mm (+smaller needles for rib)
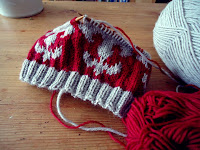
Skeins: <1 for base colour and <1 for contrast colour


Instructions:
Knitted in the round, bottom-up. 
Cast on 104 st. Knit rib (knit 2, purl 2) for 8 rows on circular needle with contrast colour on smaller needle. Change to 4mm circular needle and begin stockinette with base colour. Add 1st on the first row. Knit 2 rows and begin patterning according to chart repeating the patternig 5 times. After the chart knit 9 more rows stockinett. 


Decrease rows (use double pointed needles):
1st decrease row: K 1, SKP (=slip one, knit one, pass slipped stitch over) , K 16, K2TOG (= knit 2 together). Repeat 4 more times =95st.
2nd d. row: K 95st.
3rd d. row: K1, SKP, K 13, K2TOG. Repeat 4 more times = 85st.
4th d. row: K 85st.
5th d. row:  K1, SKP, K 11, K2TOG. Repeat 4 more times =75st.
Continue the decreases in this manner decreasing 10st on every row.
When you have 25st left: K1, SK2P (=Slip 1, knit 2 together, pass slip stitch over the knit 2 together), K1. Repeat 4 more times = 15st.
K1, K2TOG, K1. Repeat 4 times. =10st.
Cut the yarn and run the thread tail through remaining 10 stitches twice; pull firmly and darn in the end.

Add a tassel if it tickles your fancy.

Wednesday, January 12, 2011

Cute n Cool Blog Stuff by Itkupilli

I must confess I loooove all the blog stuff designed by Itkupilli, free backgrounds, headers, pictures, gadgets.. Strongly recommend!
Had to change my background again, this one is simply beautiful!

For "Cute n Cool Blog Stuff" go to http://blo64rt.blogspot.com/

Tuesday, January 11, 2011

Vest for Baby E

Here's a little something I made out of scrap yarn (the vest, that is, not the baby), inspired by pure boredom and the will to knit something quick and simple. I used the same principle for making the patterning as described on the previous blog post. The texture looks pretty awful, lumpy and uneven, but I blame that on the fever and I'm sure my readers will appreciate the pattern despite my own inability to make my designs look perfect in real life. 

Mr E is the son of a football fanatic and I think the fresh sporty colours suit him perfectly. The finished measurements are 52cm around the chest and 29cm from hem to shoulder. Mr E is now only 2 months old and the vest is a bit loose at the moment but he'll fill it nicely in no time.

Yarn: Novita 7 veljestä  (150 g = 300 m, 75% wool / 25% polyamide)
Gauge: 20 st = 10cm
Needle: 4mm (+smaller needles for rib)
Skeins: <1 for base colour and <1 for contrast colour


Instructions:
Knitted in the round, bottom-up. 
Cast on 104 st. Knit rib (knit 2, purl 2) for 6 rows on circular needle with contrast colour on smaller needle. Change to 4mm circular needle and begin stockinette with base colour. Add 1st on the first row. Knit 5 rows and begin patterning according to chart. After the chart knit 8 more rows stockinette before shaping the armholes. Leave the 53st on the back on hold and work the front (52st) first.


Front:
1st row: Cast off 4st, K 48.
2nd row: turn back and cast off 4, purl 44.
3rd row of the front: K 1, SKP (=slip one, knit one, pass slipped stitch over) , K 38, K2TOG (= knit 2 together) .
4th row: P42.
5th row: K 1, SKP, K 36, K2TOG.
Knit stockinette with the remaining 40st for 3 rows and begin shaping neck. 


Right front: 
1st row: K 17, K2TOG, K1.
2nd row:  Turn over and P19. 
3rd row: K16, K2TOG, K1. 
Continue decreasing stitches in this manner until you have 10 st left. Cast off loosely. 

Left front:
1st row: K 1, SKP, K 17.
2nd row: P 19. 
3rd row: K1, SKP, K16.
Continue decreasing stitches in this manner until you have 10 st left. Cast off loosely. 

Back: 
1st row: Cast off 4st, K 49.
2nd row: Cast off 4, purl 45.
3rd row of the back: K 1, SKP, K 39, K2TOG.
4th row: purl. 5th row: K 1, SKP, K 37, K2TOG.
Continue stockinette with the remaining 41st for 15 rows. Leave 17st in the middle of the back on hold for shaping the neck line.


Left shoulder: 
1st row: K1 SKP, K9. 
2nd row: P 11. 
3rd row: K1, SKP, K8. 
4th row: P 10. 
Cast off loosely.


Right shoulder: 
1st row: K9, K2TOG, K1.
2nd row: P 11. 
3rd row: K8, K2TOG, K1.
4th row: P 10. 
Cast off loosely.

Finishing:  
Sow the shoulders together. Pick up 56st from the side of each armhole and knit rib (K2, P2) for 5 rows. Cast off loosely. Pick the 17st from the back of the neck plus 47 st from the side of the neck line. Knit rib placing 2K right in the centre of the front (essential for the decreasing on the neck). On every row decrease 2 st at this point =K2TOG, SKP. Continue rib for 5 rows, cast off loosely. 

Click to enlarge


Monday, January 10, 2011

The ABC of knitting alphabets

Been suffering from a nasty cold for two weeks and majority of the time spent home I've been mainly sleeping. Like a baby. Having some mad dreams. Mad I tell you. Did you know that toddlers take their heads off before having a wash? I do now, thanks to my informative yet entertaining fever dreams. 

But now I'm starting to get tired of just sleeping and thought I'd share my way of creating knitting patternings from alphabets and simple pictures. In it's simplicity it's sheer genious. 

 You'll be needing MS Paint and Excel (or similar). Easy as A B C..


Instructions:
Open Paint and look for a font you'd like to use. Note that you can manually change the font size to be bigger than font sizes offered on the drop down menu, just type in 150 for example for massive big letters.  I used the font AR JULIAN, bold, font size 200 in a lovely shade of green.


Next go to Excel and create a chart that matches the amount of rows and stitches you want for your patterning. You can see the amount of cells selected in the field circled with red here. I wanted my patterning to be for 28 rows and 21 stitches. Select and copy the chart and paste it to Paint next to your letter.


Resize the letter to match your chart.


Now move the chart on top of the letter and remember to select see-through option.


Go through the outlines of your letter. Check all the cells that are mainly covered with your contrast colour already (in this case green) and fill in the remaining parts of the cells with the same contrast colour using the "bucket tool". For all the cells that are mainly in the white area use the same function or the eraser tool to erase any left over bits of the contrast colour leaving them white as the background.


After doing this you can still see the outlines of the letter (here in yellow and blue) and if they really bug you, you can zoom in on the picture and erase them away. Your chart is ready for you to start knitting!


Now I'm off to bed. Hoping to be well enough to do a bit of knitting tomorrow and maybe share a new pattern with some ABC's involved..

Thursday, January 6, 2011

Raspberry Cardie

This simple cardie took a while to make due to improper planning. I already finished this once but wasn't overly happy the way it turned out. The plan had worked well on paper but just didn't fit the way I had imagined. So, I unraveled the whole back part and the sleeves and front pieces right down to the armpits and redid them again. I added a bit of lenght and this time I used raglan decreases for a closer fit and I'm relatively satisified with the results. 


Not sure I should publish the pattern, cause it's not really refined and well planned from the armpits up, if I had any motivation left I'd probably do it once more and decrease more stitches on the raglan part but I just can't be arsed and to me this is good enough as it is.


So I'll just publish a rough pattern to give an idea how this was made and it's up to you to make desired changes should you wish to try this at home.

Yarn: Novita Sirkus  (100g = 100 m, 100% acrylic)
Gauge: 11 st = 10cm stockinette
Needle: 7mm
Skeins:8
Size: L
Hooks used here are from NeppiNappi


Instructions: 
Back:
Cast on 58st. Knit garter stitch for the first 4 rows. Knit stockinette for the rest of the piece. Decrease 1 on both sides every 14 rows from the hem up 4 times. When you reach 60 cm cast off 3st on both sides and start raglan decrease decreasing 1st on every 4th row at both ends of the row 6 times. For the neck decrease 10 st at the second last row in the middle. Leave the stitches on both shoulders on hold.


Right front:
Cast on 34st. Knit garter stitch for the first 4 rows. Knit 15st and begin cabled pattern as per chart and then K6. Decrease 1st at the right edge every 14 rows from the hem up 4 times. When you reach 60 cm cast off 3st at the right edge and start raglan decrease decreasing 1st on every 4th row 6 times. Leave the remaining stitches on hold.


Left front:
Mirror image of right front piece.

Sleeves:
Cast on 30st. Knit garter stitch for the first 4 rows. In order to make the cable pattern fit nicely on the arm, place the pattern bit off from the center of the sleeve towards the body. On the right sleeve knit 12, begin the cable pattern for the sleeve and knit the remaining 10st. On the left sleeve do the opposite. Add 1st on both ends of the row every 8th row 6 times. After 40cm start raglan decrease same way as on other pieces. Leave the remaining stitches on hold.

Finishing:  
Sow the pieces together. Pick up stitches from the sides of the front pieces and knit garter stitch for 5 rows and cast off loosely. For the neck pick up stitches from all the pieces left on hold and knit one row. On second row decrease stitches by half by knitting every 2 stitches together. Knit the next row. On the third row knit every 2 stitches together on the other sides but knitting stockinette on the back side. Knit garter stitch for about 5 rows and cast off loosely. Add the hooks and you're done!


Note: Better pictures to follow later..


Saturday, January 1, 2011

A raspberry flop

When I started writing this blog I decided not to only share the glorious victories but also the painfull losses in the battle against yarn. New year's resolution: never make such decisions of unnecessary honesty again.

It pains me to publish this. It was supposed to be a lovely cardie to be worn at work. A beautiful chunky texture and lovely raspberry colour. I look like a chunky raspberry in it alright. Plumb and ripe for picking. Round and lumpy. Need I say more? This project totally croaked. But I will not give up.....